
Tutorials
Git is a fabulous tool for source control management. While incredibly powerful, it can be a little daunting to learn at first. The following tutorials will help. They are organized from basic to more advanced.
- tryGit, an interactive tutorial
- Learn Git Branching, an interactive tutorial
- GitFlow, a very good read on the basic workflow / process used for FlightNode development
- Forking Workflow,
in fact we using the Forking Workflow to facilitate collaboration, but with the
GitFlow branching structure at the core.
- In your local clones, create a new remote called *upstream**, pointing to the
main repository:
git remote add upstream https://github.com/FlightNode/FlightNode.xyz - When you want to get the latest code from the shared repository, you’ll now
be able to use
git pull upstream <somebranch>.
- In your local clones, create a new remote called *upstream**, pointing to the
main repository:
- [Pull Request Tutorial]9https://github.com/yangsu/pull-request-tutorial), with many nice screenshots and some advanced functionality, such as squash, rebase, and cherry-pick.
- Pro Git, the entire book, is available online for free.
Typical Workflow
Once you’ve created your forks on GitHub, and your clones on your workstation, a typical day might look like this:
- Open Git-bash and cd to a workspace:
cd /c/workspaces/FlightNode/FlightNode.Identity - Planning on working on Issue #10 today… so create a feature branch:
git checkout -b feature/10 - You don’t want to get out-of-date, or you may start running into major merge
difficulties. Therefore:
git pull upstream develop - Work on some code in your editor of choice.
- Stage your code:
- New file:
git add full/path/to/new/file.cs - All existing files:
git add -u :/ - All existing files in a particular directory:
git add -u :full/path
- New file:
- Do some more work, stage some more work.
- Commit your changes:
git commit -m "10 - brief description"
(for longer description, enter a brief description on first line, then hit enter to type the longer description starting on the next line. Finish with “). - Done for the day? Want to backup your code? Push to your fork:
git push origin feature/10 - Is the feature ready for other people to use? Then create a pull request in GitHub. In the pull request, add comments directly in the file if you want to explain something about your work. And invite others to review your code.
Graphical Git
SourceTree
Many people really like SourceTree, a tool from Atlassian. I have it installed and have not yet really used it, because I’m completely comfortable with using the command line.
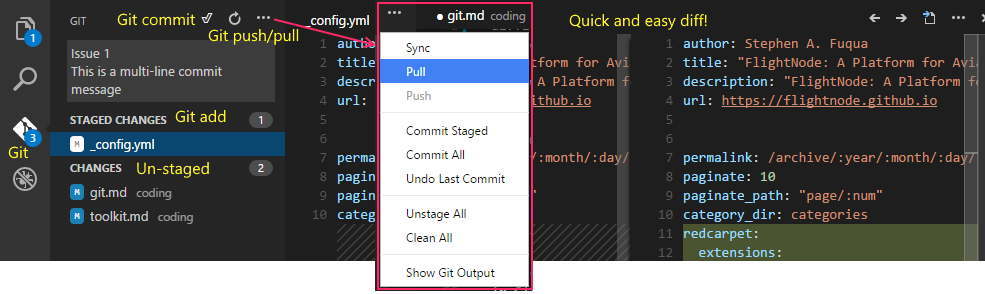
Visual Studio Code
Visual Studio Code’s Git support is top-notch, when you don’t feel like using the command line. You can use the tool to perform:
git add(new or updated files, and it has a different little icon for each status)git commit(supports multi-line commit messages by using Ctrl-Enter)git pushgit pull
There is no git sync command and I don’t know what the Sync comand here does.
Maybe it runs pull then push?
Perhaps the best thing about VSCode’s integration: it makes the cumbersome process of un-staging and/or reverting your code changes very easy.
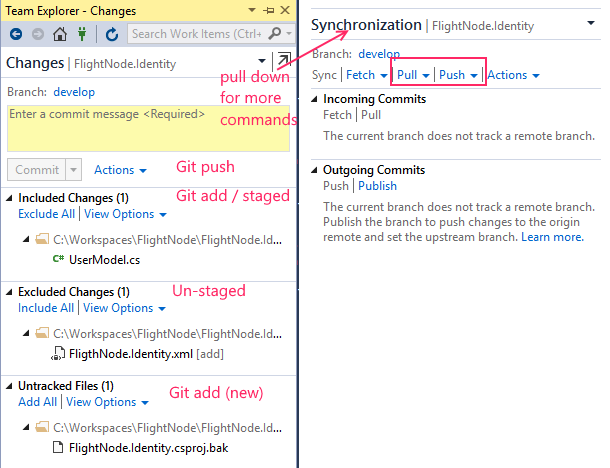
Visual Studio 2015
Visual Studio 2015’s support is actually pretty good too. I was biased against it for a long time, probably because they automatically stage files (“tracked files”) and make you purposefully unstage them (“un-tracked files”). But for most people that’s probably not a bad thing. And while I haven’t used it in VS2013 in many months, I feel like the 2015 experience is somehow a little better and a little more powerful than its predecessor.
Posted with : Development Toolkit